Intro Link to heading
So I have an old friend, a trusty HP desktop that’s been running at home for a long time. It acts as a media server, a router, and runs a bunch of services. I also use it as a sandbox to try out new things on a regular basis.
Over time, this old system has become a crucial part of my daily workflow. That got me thinking: What if its aging hard drive fails? Rebuilding the entire setup from scratch would be a huge pain.
To reduce that stress, I started writing a Dockerfile to replicate the system setup. Every time I made a change to the system, I tried to reflect it in the Dockerfile so in case of HDD failure, I could just install a clean OS and re-run the setup commands. But I knew the Dockerfile wasn’t bulletproof. It had never been fully tested, and there was always a chance I’d forget something important.
Then I had an idea: What if I could somehow convert the Docker image into a bootable image?
How Linux boots Link to heading
To answer that question, I first needed to understand how Linux actually boots, at least to some depth.
Here’s what I found out:
There are three main components involved in the Linux boot process:
- Boot loader
- Kernel
- User-land applications
When a computer starts, it reads the BIOS configuration and goes through the boot priorities one by one. If one of those priorities is a disk, the machine reads its partition table and looks for a partition marked with the “boot” flag. For each bootable partition, the computer reads the first sector, usually the first 512 bytes.
That tiny program is called the MBR (Master Boot Record), and it takes over the boot process, giving the CPU instructions on what to do next.
The boot loader’s main job is to find the kernel on the disk, based on its config, and execute it, so the kernel can handle the rest of the boot process.
GRUB is the most common boot loader on Linux systems, and it does a pretty good job.
Once the kernel starts running, it still needs some extra files like kernel modules and instructions on how and where to mount filesystems.
So, the kernel creates a temporary filesystem in RAM and looks for a file named initrd.img, which it mounts as initramfs.
Basically, initrd.img is a tiny disk image that holds a bunch of binaries and config files.
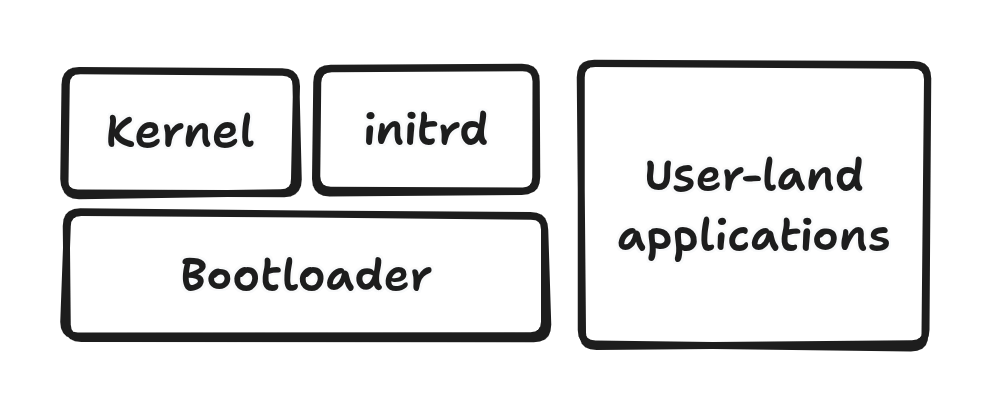
When the kernel is ready, it runs the init system. On most modern distros, this is systemd, which is responsible for starting services, scheduling processes, and generally managing the system. It’s the main process that keeps everything running.
Now here’s the catch:
In a Docker image, I only have the environment after the kernel has already done its job. And since systemd doesn’t usually work in containers, the init system inside a Docker image, which called ENTRYPOINT, probably isn’t suitable for booting a physical machine.
Prepare the docker image Link to heading
Let’s imagine I have a Docker image that’s supposed to run Apache as its web server:
FROM debian:12
RUN apt update
RUN apt -y install apache2
Now, let’s prepare this image to solve the problem we talked about earlier: the missing init system
I want to use systemd as the init system. Let’s install it:
FROM debian:12
RUN apt update
+ RUN apt -y install systemd-sysv
RUN apt -y install apache2
That’s it. Pretty simple so far.
Next problem: what’s going to run systemd?
Right the kernel.
So, let’s install the kernel too:
FROM debian:12
+ ARG DEBIAN_FRONTEND="noninteractive"
RUN apt update
+ RUN apt -y install linux-image-amd64 firmware-linux-free console-setup-linux
RUN apt -y install systemd-sysv
RUN apt -y install apache2
Here’s what those packages do:
linux-image-amd64: the actual kernel binaryfirmware-linux-free: drivers to help the kernel work with various hardwareconsole-setup-linux: includes fonts used for displaying boot messages on the console
Installing the linux-image-amd64 package also automatically creates an initrd (initial RAM disk) next to the kernel in the /boot directory.
So now, our Docker image contains:
- the kernel
- the init system (
systemd) - the initrd
- and Apache installed and ready to go
And there is another necessary step: Change or unset the root password For sake of simplicity i just unset the root password:
FROM debian:12
ARG DEBIAN_FRONTEND="noninteractive"
RUN apt update
RUN apt -y install linux-image-amd64 firmware-linux-free console-setup-linux
RUN apt -y install systemd-sysv
RUN apt -y install apache2
+ RUN passwd -d root
Let’s build the image. Save this Dockerfile into an empty directory and run:
$ docker build -t my-machine .

[+] Building 74.8s (9/9) FINISHED                                                                   docker:default
 => [internal] load build definition from Dockerfile                                                          0.0s
 => => transferring dockerfile: 244B                                                                          0.0s
 => [internal] load metadata for docker.io/library/debian:12                                                  0.0s
 => [internal] load .dockerignore                                                                             0.0s
 => => transferring context: 2B                                                                               0.0s
 => [1/5] FROM docker.io/library/debian:12                                                                    0.0s
 => CACHED [2/5] RUN apt update                                                                               0.0s
 => [3/5] RUN apt -y install linux-image-amd64 firmware-linux-free console-setup-linux                       41.7s
 => [4/5] RUN apt -y install systemd-sysv                                                                    17.6s
 => [5/5] RUN apt -y install apache2                                                                         13.2s
 => exporting to image                                                                                        2.3s
 => => exporting layers                                                                                       2.2s
 => => writing image sha256:70dd128a6063fa70520f720a43fab288fa48269c42f01dd9111a71c1a444c052                  0.0s
 => => naming to docker.io/library/my-machine                                                                 0.0s
Everything from this point onward will happen outside of Docker.
Real Magic Link to heading
So let’s make a disk image:
$ fallocate --length 1G /tmp/debian.img
That was easy, right? Now let’s create a partition table in it:
$ fdisk /tmp/debian.img
You can press m to see a list of commands in fdisk, but let’s walk through it together:
- Enter
nto create a new partition. Just go with the default values to make it a primary partition. - Now, enable the boot flag on that partition by entering
a. - Finally, enter
wto write the changes and exit.
$ fdisk /tmp/debian.img

Welcome to fdisk (util-linux 2.39.3).
Changes will remain in memory only, until you decide to write them.
Be careful before using the write command.

Device does not contain a recognized partition table.
Created a new DOS (MBR) disklabel with disk identifier 0x064f094a.

Command (m for help): n
Partition type
   p   primary (0 primary, 0 extended, 4 free)
   e   extended (container for logical partitions)
Select (default p):

Using default response p.
Partition number (1-4, default 1):
First sector (2048-2097151, default 2048):
Last sector, +/-sectors or +/-size{K,M,G,T,P} (2048-2097151, default 2097151):

Created a new partition 1 of type 'Linux' and of size 1023 MiB.

Command (m for help): a
Selected partition 1
The bootable flag on partition 1 is enabled now.

Command (m for help): p
Disk /tmp/debian.img: 1 GiB, 1073741824 bytes, 2097152 sectors
Units: sectors of 1 * 512 = 512 bytes
Sector size (logical/physical): 512 bytes / 512 bytes
I/O size (minimum/optimal): 512 bytes / 512 bytes
Disklabel type: dos
Disk identifier: 0x064f094a

Device           Boot Start     End Sectors  Size Id Type
/tmp/debian.img1 *     2048 2097151 2095104 1023M 83 Linux

Command (m for help): w
The partition table has been altered.
Syncing disks.
flowchart LR
A[Disk]-->B[Partition]-->D[Boot Loader]-->E[Kernel]-->F[SystemD]-->G[User Apps]
style G fill:#9ccc65,stroke:#8bc34a
style F fill:#9ccc65,stroke:#8bc34a
style E fill:#9ccc65,stroke:#8bc34a
style A fill:#9ccc65,stroke:#8bc34a
Link to heading
Now that our disk is ready, we need to create an ext4 filesystem on the first partition.
To do that, we need to map the disk image to a loop device so we can access the partition directly:
$ losetup -f --partscan --show /tmp/debian.img

/dev/loop14
This will print something like /dev/loopX. Take note of the number.
Now format the first partition:
$ mkfs.ext4 /dev/loopXp1  # Replace X with the loop number

mke2fs 1.47.0 (5-Feb-2023)
Discarding device blocks: done
Creating filesystem with 261888 4k blocks and 65536 inodes
Filesystem UUID: 5c3a1853-012e-473b-ae20-59d73d69dd56
Superblock backups stored on blocks:
        32768, 98304, 163840, 229376

Allocating group tables: done
Writing inode tables: done
Creating journal (4096 blocks): done
Writing superblocks and filesystem accounting information: done
In the output of this command, look for a line like this:
Filesystem UUID: 5c3a1853-012e-473b-ae20-59d73d69dd56
Hold on to that UUID we’ll need it soon.
Let’s mount our newly created filesystem somewhere:
$ mkdir -p /tmp/debian
$ mount /dev/loopXp1 /tmp/debian
It’s time to pour our Docker image content into the disk.
Since Docker images are layered, we first need to create a dummy container from the image and then export its contents:
$ docker run -d my-machine

b5387ce37f601d568105a1a6cf516c5420b5031a320fb86f4e3d404d7e53f057
This runs a container based on the my-machine image and prints out a container ID.
Use that ID to export its filesystem:
$ docker export {CONTAINER_ID} > /tmp/container.tar
$ tar -C /tmp/debian --numeric-owner -xf /tmp/container.tar
Now our partition is filled with the kernel, initrd, and all user-land applications.
The final piece of the puzzle is the bootloader
As I mentioned earlier, most Linux distros use GRUB. But for the sake of simplicity and because I don’t need most of GRUB’s features, I chose to go with extlinux.
Let’s install it:
$ extlinux --install /tmp/debian/boot

/tmp/debian/boot is device /dev/loopXp1
Warning: unable to obtain device geometry (defaulting to 64 heads, 32 sectors)
         (on hard disks, this is usually harmless.)
Now configure it by creating /tmp/debian/boot/syslinux.cfg:
DEFAULT linux
  SAY Now booting the kernel from SYSLINUX...
LABEL linux
  KERNEL /vmlinuz
  APPEND rw root=UUID=PRIMARY_PART_UUID initrd=/initrd.img
Be sure to replace PRIMARY_PART_UUID with the UUID you got from the mkfs.ext4 output earlier.
Lastly, how does the system know to run extlinux?
That’s where the MBR comes in. We’ll write it to the first sector of the disk image:
$ umount /tmp/debian
$ losetup -d /dev/loopX
$ dd if=/usr/lib/syslinux/mbr/mbr.bin of=/tmp/debian.img bs=440 count=1 conv=notrunc

1+0 records in
1+0 records out
440 bytes copied, 0.000385857 s, 1.1 MB/s
And that’s it! Your Docker image is now embedded in a bootable disk image.
Test Flight Link to heading
If you have QEMU installed (like I do), I highly recommend testing the image right from your system:
$ qemu-system-x86_64 -hda /tmp/debian.img -m 512
You can, of course, go one step further and write the image to a USB stick to boot it on a physical machine:
$ dd if=/tmp/debian.img of=/dev/sdX status=progress
Just make sure to replace /dev/sdX with your actual USB device path and be very careful, because dd doesn’t ask questions before wiping your drive.
Outro Link to heading
That’s it! We took a regular Docker image, added a kernel and an init system, and turned it into a fully bootable disk image using nothing but familiar Linux tools.
This isn’t the “standard” way to install a Linux system, but it can definitely come in handy, especially for VPS setups, recovery use-cases, and auto-provisioning systems where you want full control over your base image.
Based on this method, I published the bootable image I use for my own home server on GitHub:
👉 https://github.com/yeganemehr/home-server
I also wrote a small Bash script to automate the image-building process, and even set up a GitHub Actions workflow to rebuild the image automatically whenever major changes happen.
It all started as a “what if” for my old media server, but now it’s turned into a practical and flexible backup strategy and a fun learning experience along the way.
If you made it this far, thanks for reading! Feel free to write your comment in the section blow, or share your own take on it. I’d love to see what others come up with.